QuickStart
Installation
We currently support Linux, macOS, and Windows. Ubuntu 16.04 or higher, macOS 10.14.1, and Windows 10.1809 are tested and supported. Simply run the following pip install in an environment that has python >= 3.5.
Linux and macOS
python3 -m pip install --upgrade nni
Windows
python -m pip install --upgrade nni
Note:
- For Linux and macOS,
--usercan be added if you want to install NNI in your home directory; this does not require any special privileges. - If there is an error like
Segmentation fault, please refer to the FAQ. - For the
system requirementsof NNI, please refer to Install NNI on Linux&Mac or Windows.
“Hello World” example on MNIST
NNI is a toolkit to help users run automated machine learning experiments. It can automatically do the cyclic process of getting hyperparameters, running trials, testing results, and tuning hyperparameters. Here, we’ll show how to use NNI to help you find the optimal hyperparameters for a MNIST model.
Here is an example script to train a CNN on the MNIST dataset without NNI:
def run_trial(params):
    # Input data
    mnist = input_data.read_data_sets(params['data_dir'], one_hot=True)
    # Build network
    mnist_network = MnistNetwork(channel_1_num=params['channel_1_num'], channel_2_num=params['channel_2_num'], conv_size=params['conv_size'], hidden_size=params['hidden_size'], pool_size=params['pool_size'], learning_rate=params['learning_rate'])
    mnist_network.build_network()

    test_acc = 0.0
    with tf.Session() as sess:
        # Train network
        mnist_network.train(sess, mnist)
        # Evaluate network
        test_acc = mnist_network.evaluate(mnist)

if __name__ == '__main__':
    params = {'data_dir': '/tmp/tensorflow/mnist/input_data', 'dropout_rate': 0.5, 'channel_1_num': 32, 'channel_2_num': 64, 'conv_size': 5, 'pool_size': 2, 'hidden_size': 1024, 'learning_rate': 1e-4, 'batch_num': 2000, 'batch_size': 32}
    run_trial(params)
Note: If you want to see the full implementation, please refer to examples/trials/mnist-tfv1/mnist_before.py.
The above code can only try one set of parameters at a time; if we want to tune learning rate, we need to manually modify the hyperparameter and start the trial again and again.
NNI is born to help the user do tuning jobs; the NNI working process is presented below:
input: search space, trial code, config file
output: one optimal hyperparameter configuration

1: For t = 0, 1, 2, ..., maxTrialNum,
2:      hyperparameter = chose a set of parameter from search space
3:      final result = run_trial_and_evaluate(hyperparameter)
4:      report final result to NNI
5:      If reach the upper limit time,
6:          Stop the experiment
7: return hyperparameter value with best final result
If you want to use NNI to automatically train your model and find the optimal hyper-parameters, you need to do three changes based on your code:
Three steps to start an experiment
Step 1: Give a Search Space file in JSON, including the name and the distribution (discrete-valued or continuous-valued) of all the hyperparameters you need to search.
-   params = {'data_dir': '/tmp/tensorflow/mnist/input_data', 'dropout_rate': 0.5, 'channel_1_num': 32, 'channel_2_num': 64,
-   'conv_size': 5, 'pool_size': 2, 'hidden_size': 1024, 'learning_rate': 1e-4, 'batch_num': 2000, 'batch_size': 32}
+ {
+     "dropout_rate":{"_type":"uniform","_value":[0.5, 0.9]},
+     "conv_size":{"_type":"choice","_value":[2,3,5,7]},
+     "hidden_size":{"_type":"choice","_value":[124, 512, 1024]},
+     "batch_size": {"_type":"choice", "_value": [1, 4, 8, 16, 32]},
+     "learning_rate":{"_type":"choice","_value":[0.0001, 0.001, 0.01, 0.1]}
+ }
Implemented code directory: search_space.json
Step 2: Modify your Trial file to get the hyperparameter set from NNI and report the final result to NNI.
+ import nni

  def run_trial(params):
      mnist = input_data.read_data_sets(params['data_dir'], one_hot=True)

      mnist_network = MnistNetwork(channel_1_num=params['channel_1_num'], channel_2_num=params['channel_2_num'], conv_size=params['conv_size'], hidden_size=params['hidden_size'], pool_size=params['pool_size'], learning_rate=params['learning_rate'])
      mnist_network.build_network()

      with tf.Session() as sess:
          mnist_network.train(sess, mnist)
          test_acc = mnist_network.evaluate(mnist)
+         nni.report_final_result(test_acc)

  if __name__ == '__main__':
-     params = {'data_dir': '/tmp/tensorflow/mnist/input_data', 'dropout_rate': 0.5, 'channel_1_num': 32, 'channel_2_num': 64,
-     'conv_size': 5, 'pool_size': 2, 'hidden_size': 1024, 'learning_rate': 1e-4, 'batch_num': 2000, 'batch_size': 32}
+     params = nni.get_next_parameter()
      run_trial(params)
Implemented code directory: mnist.py
Step 3: Define a config file in YAML which declares the path to the search space and trial files. It also gives other information such as the tuning algorithm, max trial number, and max duration arguments.
authorName: default
experimentName: example_mnist
trialConcurrency: 1
maxExecDuration: 1h
maxTrialNum: 10
trainingServicePlatform: local
# The path to Search Space
searchSpacePath: search_space.json
useAnnotation: false
tuner:
  builtinTunerName: TPE
# The path and the running command of trial
trial:
  command: python3 mnist.py
  codeDir: .
  gpuNum: 0
Note, for Windows, you need to change the trial command from python3 to python.
Implemented code directory: config.yml
All the cod above is already prepared and stored in examples/trials/mnist-tfv1/.
Linux and macOS
Run the config.yml file from your command line to start an MNIST experiment.
nnictl create --config nni/examples/trials/mnist-tfv1/config.yml
Windows
Run the config_windows.yml file from your command line to start an MNIST experiment.
Note: if you’re using NNI on Windows, you need to change python3 to python in the config.yml file or use the config_windows.yml file to start the experiment.
nnictl create --config nni\examples\trials\mnist-tfv1\config_windows.yml
Note: nnictl is a command line tool that can be used to control experiments, such as start/stop/resume an experiment, start/stop NNIBoard, etc. Click here for more usage of nnictl
Wait for the message INFO: Successfully started experiment! in the command line. This message indicates that your experiment has been successfully started. And this is what we expect to get:
INFO: Starting restful server...
INFO: Successfully started Restful server!
INFO: Setting local config...
INFO: Successfully set local config!
INFO: Starting experiment...
INFO: Successfully started experiment!
-----------------------------------------------------------------------
The experiment id is egchD4qy
The Web UI urls are: [Your IP]:8080
-----------------------------------------------------------------------

You can use these commands to get more information about the experiment
-----------------------------------------------------------------------
         commands                       description
1. nnictl experiment show        show the information of experiments
2. nnictl trial ls               list all of trial jobs
3. nnictl top                    monitor the status of running experiments
4. nnictl log stderr             show stderr log content
5. nnictl log stdout             show stdout log content
6. nnictl stop                   stop an experiment
7. nnictl trial kill             kill a trial job by id
8. nnictl --help                 get help information about nnictl
-----------------------------------------------------------------------
If you prepared trial, search space, and config according to the above steps and successfully created an NNI job, NNI will automatically tune the optimal hyper-parameters and run different hyper-parameter sets for each trial according to the requirements you set. You can clearly see its progress through the NNI WebUI.
WebUI
After you start your experiment in NNI successfully, you can find a message in the command-line interface that tells you the Web UI url like this:
The Web UI urls are: [Your IP]:8080
Open the Web UI url (Here it’s: [Your IP]:8080) in your browser; you can view detailed information about the experiment and all the submitted trial jobs as shown below. If you cannot open the WebUI link in your terminal, please refer to the FAQ.
View summary page
Click the “Overview” tab.
Information about this experiment will be shown in the WebUI, including the experiment trial profile and search space message. NNI also supports downloading this information and the parameters through the Download button. You can download the experiment results anytime while the experiment is running, or you can wait until the end of the execution, etc.
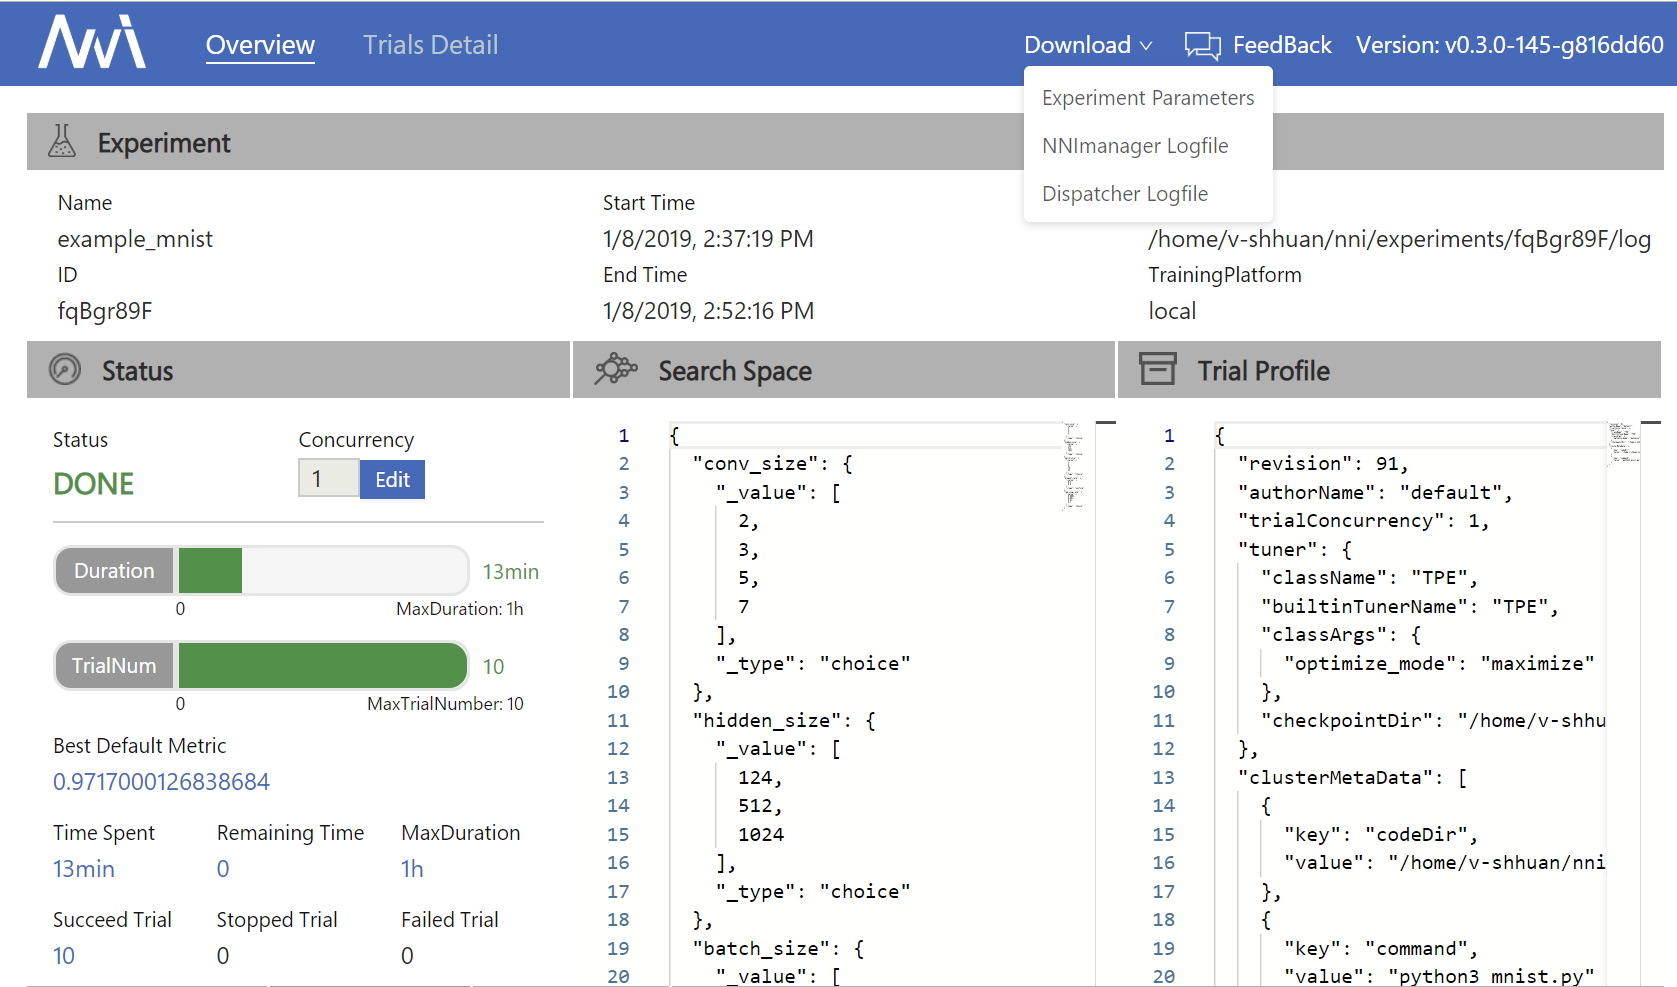
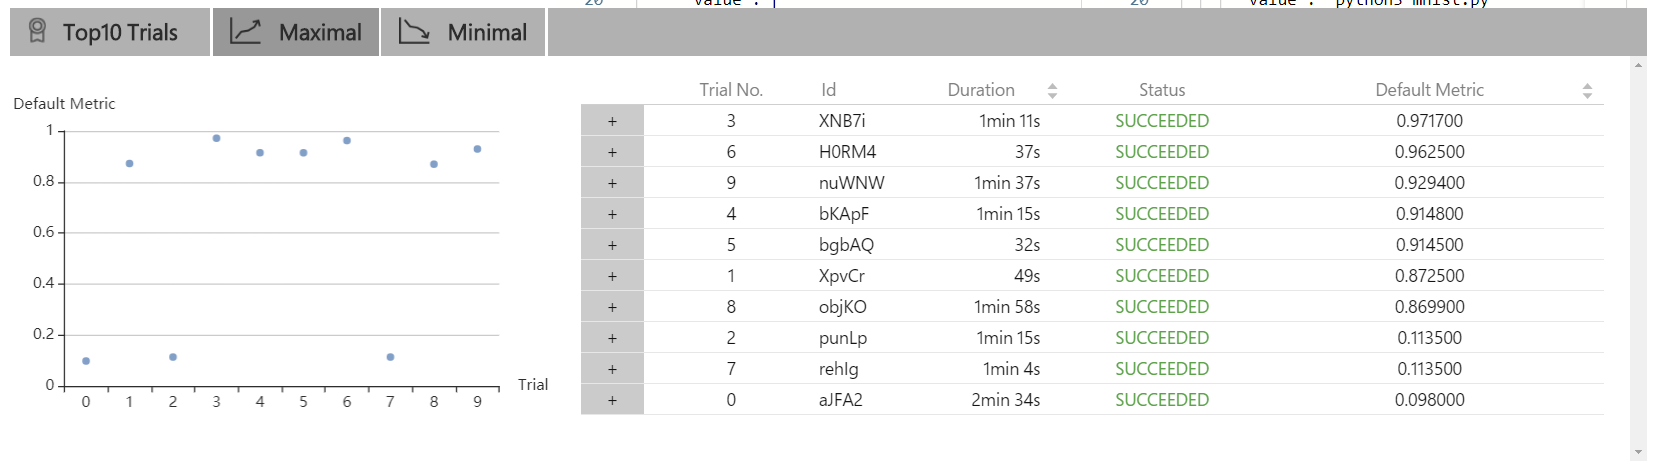
The top 10 trials will be listed on the Overview page. You can browse all the trials on the “Trials Detail” page.
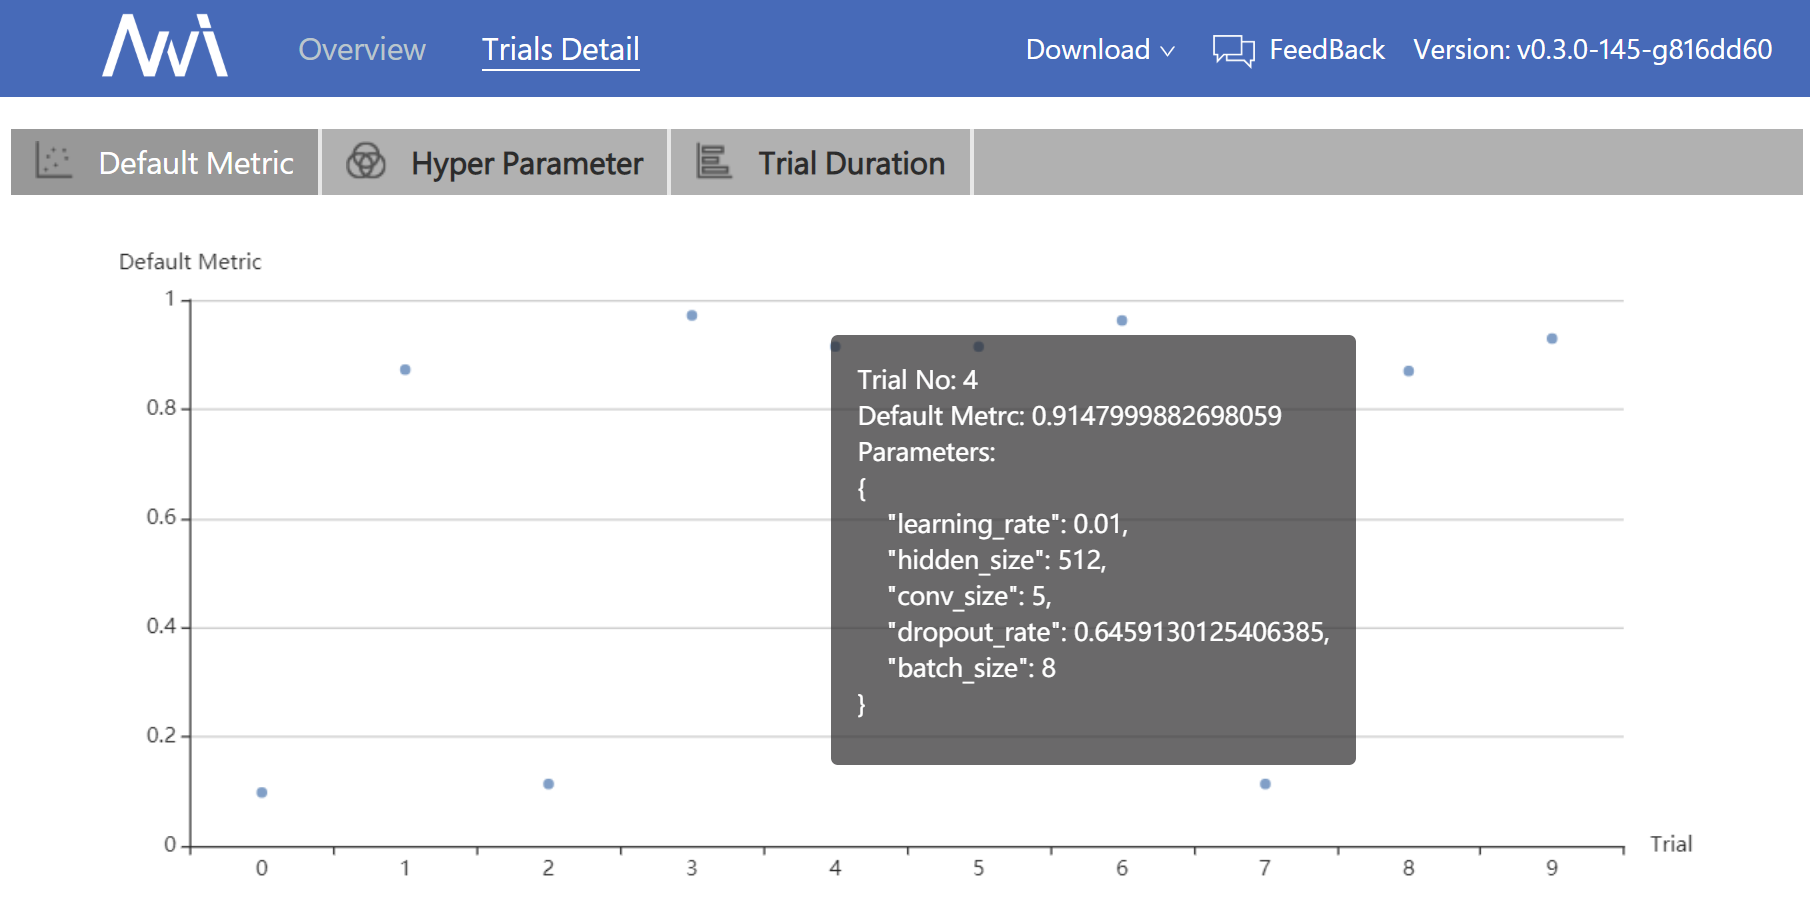
View trials detail page
Click the “Default Metric” tab to see the point graph of all trials. Hover to see specific default metrics and search space messages.
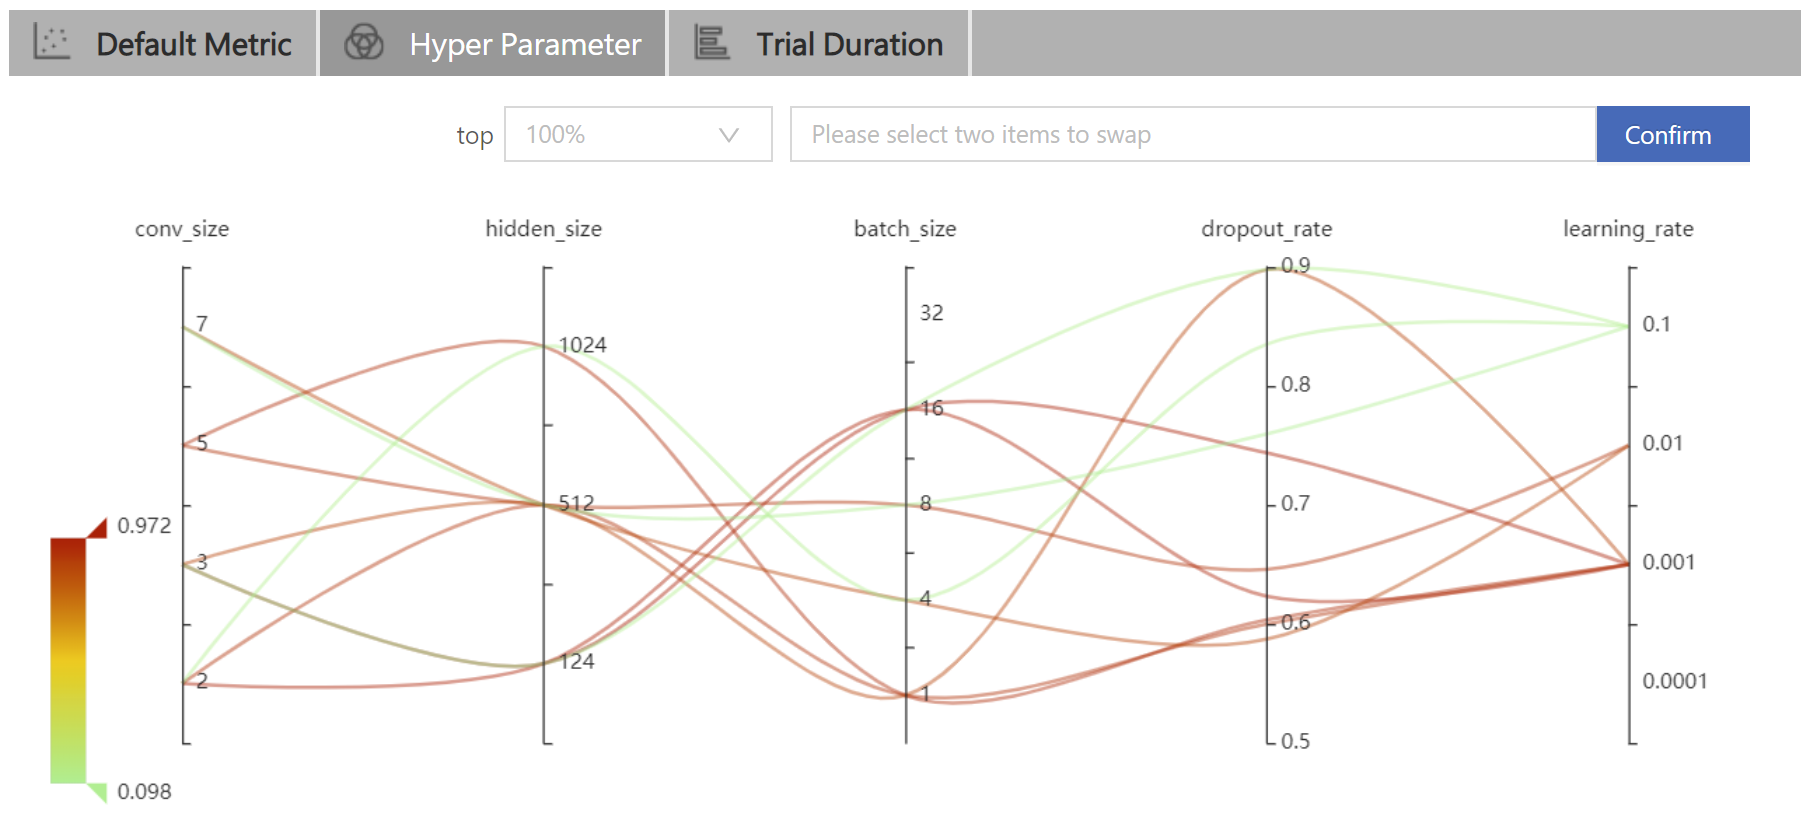
Click the “Hyper Parameter” tab to see the parallel graph.
- You can select the percentage to see the top trials.
- Choose two axis to swap their positions.
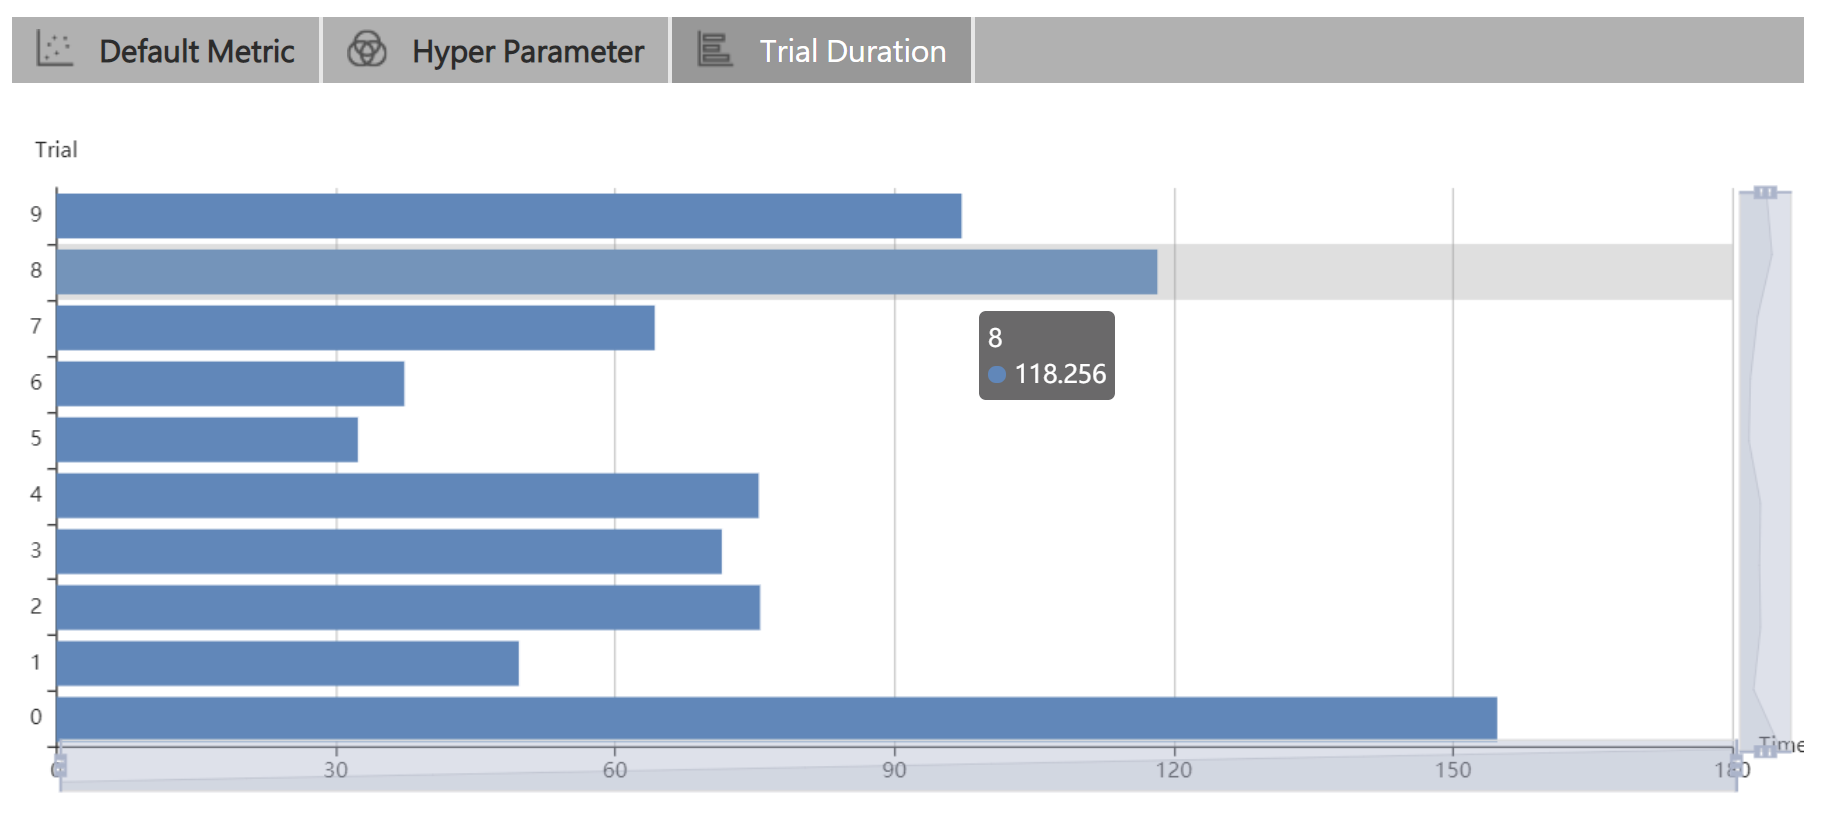
Click the “Trial Duration” tab to see the bar graph.
Below is the status of all trials. Specifically:
- Trial detail: trial’s id, duration, start time, end time, status, accuracy, and search space file.
- If you run on the OpenPAI platform, you can also see the hdfsLogPath.
- Kill: you can kill a job that has the
Runningstatus. - Support: Used to search for a specific trial.
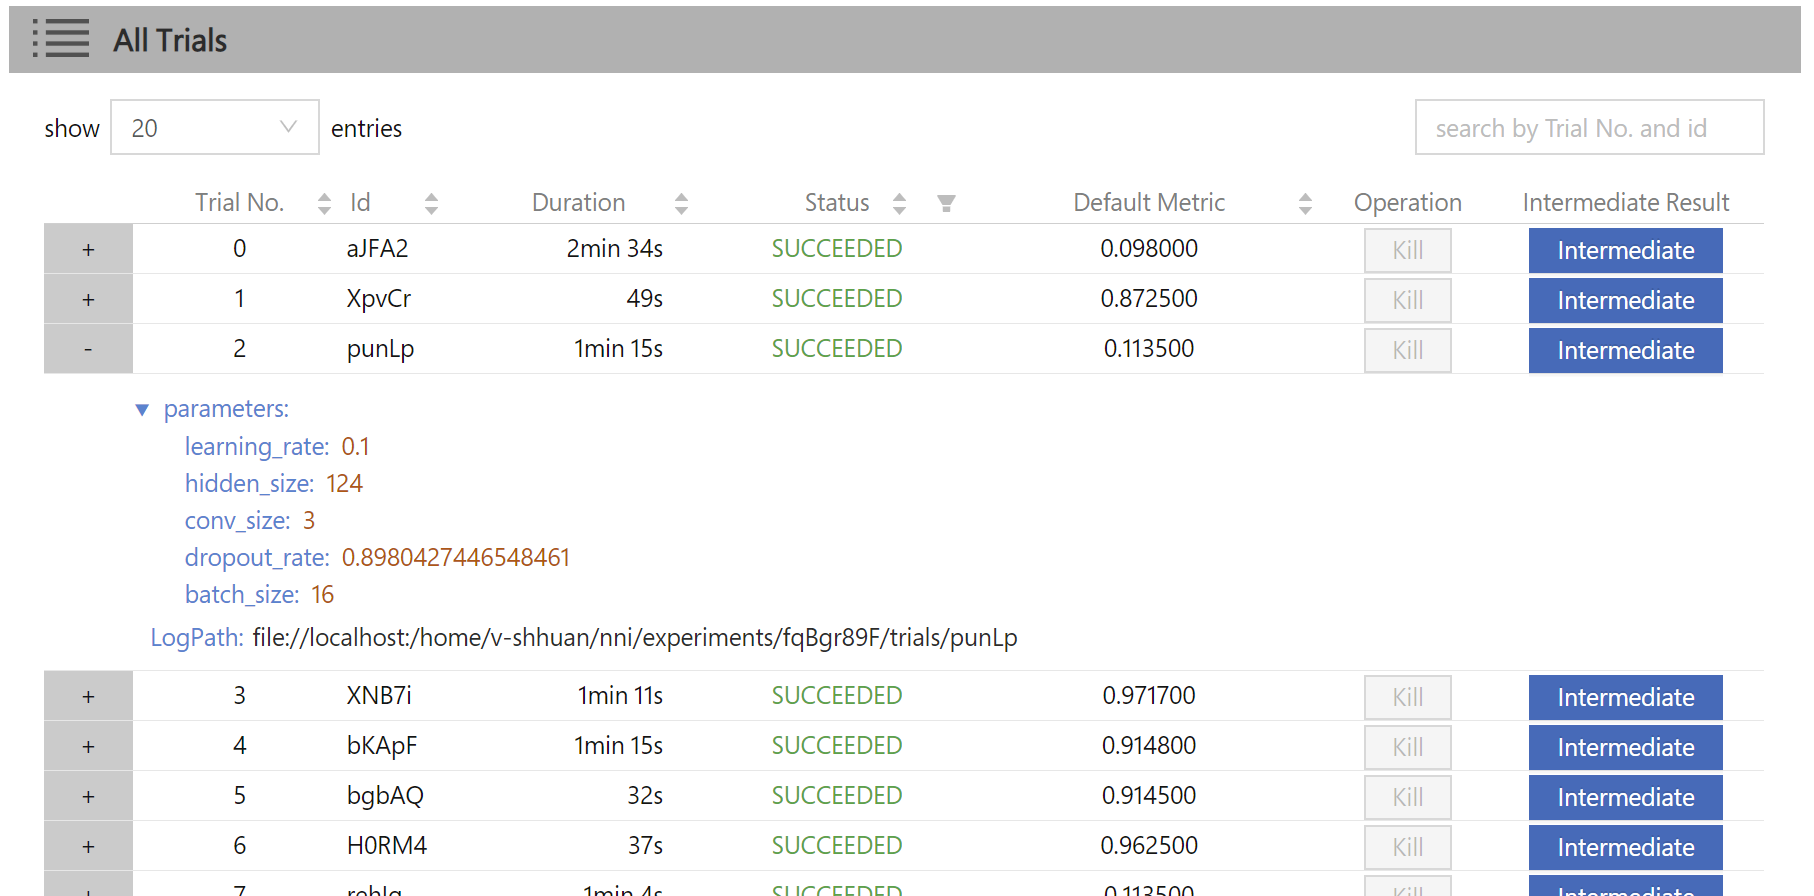
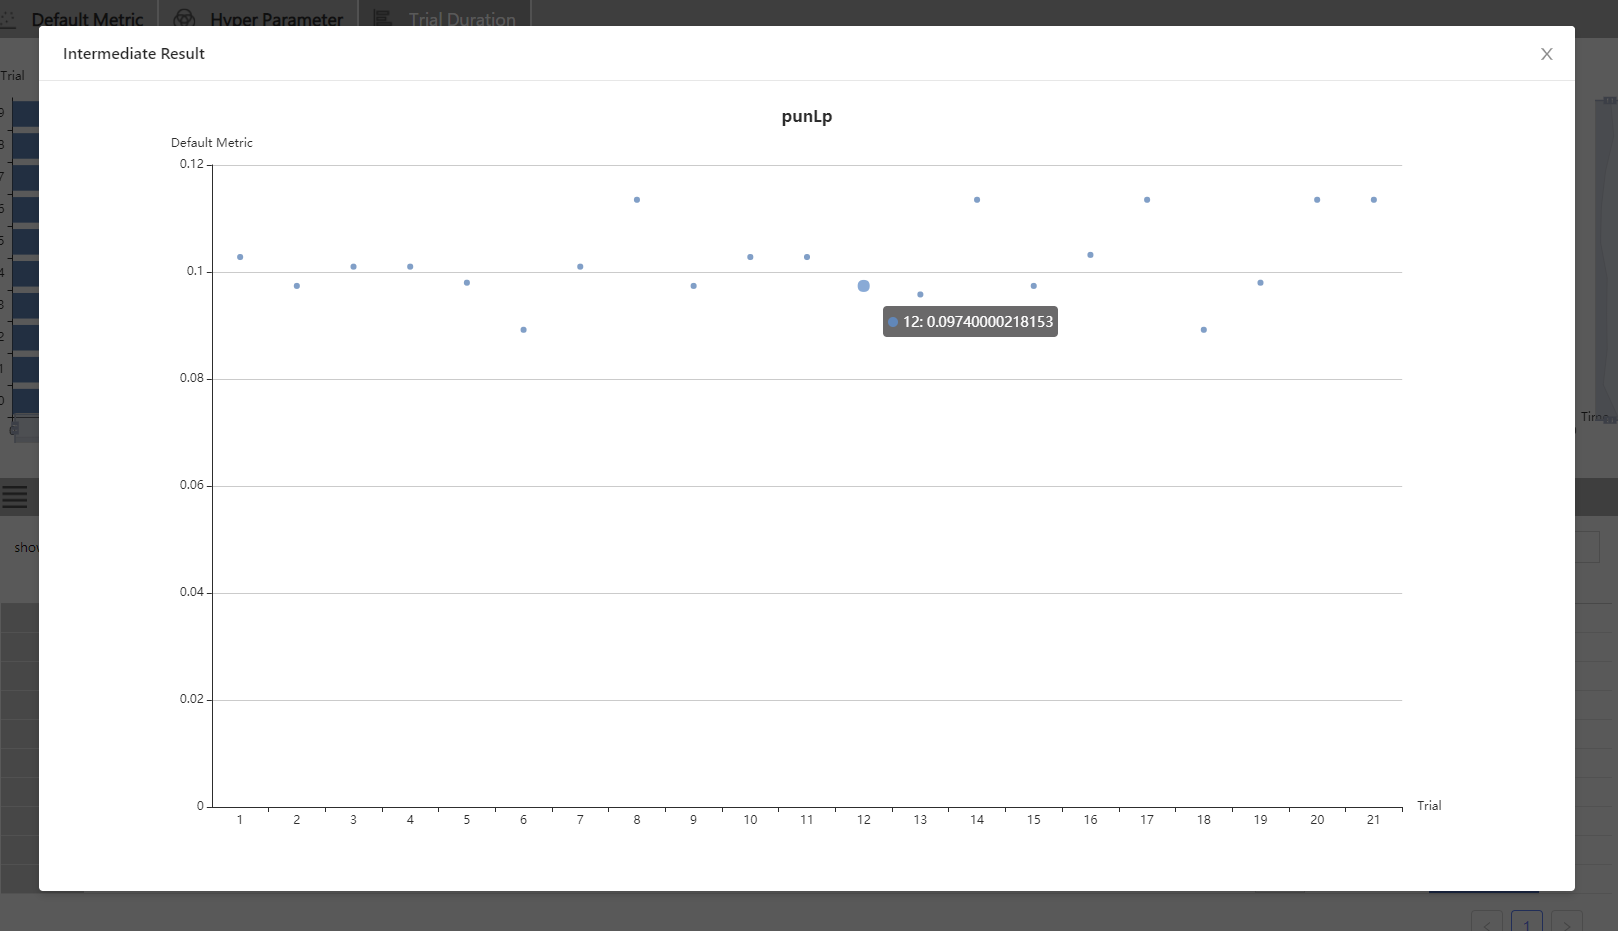
- Intermediate Result Graph