备注
Go to the end to download the full example code
Hello, NAS!
This is the 101 tutorial of Neural Architecture Search (NAS) on NNI. In this tutorial, we will search for a neural architecture on MNIST dataset with the help of NAS framework of NNI, i.e., Retiarii. We use multi-trial NAS as an example to show how to construct and explore a model space.
There are mainly three crucial components for a neural architecture search task, namely,
Model search space that defines a set of models to explore.
A proper strategy as the method to explore this model space.
A model evaluator that reports the performance of every model in the space.
Currently, PyTorch is the only supported framework by Retiarii, and we have only tested PyTorch 1.9 to 1.13. This tutorial assumes PyTorch context but it should also apply to other frameworks, which is in our future plan.
Define your Model Space
Model space is defined by users to express a set of models that users want to explore, which contains potentially good-performing models. In this framework, a model space is defined with two parts: a base model and possible mutations on the base model.
Define Base Model
Defining a base model is almost the same as defining a PyTorch (or TensorFlow) model.
Below is a very simple example of defining a base model.
import torch
import torch.nn as nn
import torch.nn.functional as F
import nni
from nni.nas.nn.pytorch import LayerChoice, ModelSpace, MutableDropout, MutableLinear


class Net(ModelSpace):  # should inherit ModelSpace rather than nn.Module
    def __init__(self):
        super().__init__()
        self.conv1 = nn.Conv2d(1, 32, 3, 1)
        self.conv2 = nn.Conv2d(32, 64, 3, 1)
        self.dropout1 = nn.Dropout(0.25)
        self.dropout2 = nn.Dropout(0.5)
        self.fc1 = nn.Linear(9216, 128)
        self.fc2 = nn.Linear(128, 10)

    def forward(self, x):
        x = F.relu(self.conv1(x))
        x = F.max_pool2d(self.conv2(x), 2)
        x = torch.flatten(self.dropout1(x), 1)
        x = self.fc2(self.dropout2(F.relu(self.fc1(x))))
        output = F.log_softmax(x, dim=1)
        return output
Define Model Variations
A base model is only one concrete model not a model space. We provide API and Primitives for users to express how the base model can be mutated. That is, to build a model space which includes many models.
Based on the above base model, we can define a model space as below.
class Net(ModelSpace):
  def __init__(self):
    super().__init__()
    self.conv1 = nn.Conv2d(1, 32, 3, 1)
-   self.conv2 = nn.Conv2d(32, 64, 3, 1)
+   self.conv2 = LayerChoice([
+       nn.Conv2d(32, 64, 3, 1),
+       DepthwiseSeparableConv(32, 64)
+   ], label='conv2)
-   self.dropout1 = nn.Dropout(0.25)
+   self.dropout1 = MutableDropout(nni.choice('dropout', [0.25, 0.5, 0.75]))
    self.dropout2 = nn.Dropout(0.5)
-   self.fc1 = nn.Linear(9216, 128)
-   self.fc2 = nn.Linear(128, 10)
+   feature = nni.choice('feature', [64, 128, 256])
+   self.fc1 = MutableLinear(9216, feature)
+   self.fc2 = MutableLinear(feature, 10)

  def forward(self, x):
    x = F.relu(self.conv1(x))
    x = F.max_pool2d(self.conv2(x), 2)
    x = torch.flatten(self.dropout1(x), 1)
    x = self.fc2(self.dropout2(F.relu(self.fc1(x))))
    output = F.log_softmax(x, dim=1)
    return output
This results in the following code:
class DepthwiseSeparableConv(nn.Module):
    def __init__(self, in_ch, out_ch):
        super().__init__()
        self.depthwise = nn.Conv2d(in_ch, in_ch, kernel_size=3, groups=in_ch)
        self.pointwise = nn.Conv2d(in_ch, out_ch, kernel_size=1)

    def forward(self, x):
        return self.pointwise(self.depthwise(x))


class MyModelSpace(ModelSpace):
    def __init__(self):
        super().__init__()
        self.conv1 = nn.Conv2d(1, 32, 3, 1)
        # LayerChoice is used to select a layer between Conv2d and DwConv.
        self.conv2 = LayerChoice([
            nn.Conv2d(32, 64, 3, 1),
            DepthwiseSeparableConv(32, 64)
        ], label='conv2')
        # nni.choice is used to select a dropout rate.
        # The result can be used as parameters of `MutableXXX`.
        self.dropout1 = MutableDropout(nni.choice('dropout', [0.25, 0.5, 0.75]))  # choose dropout rate from 0.25, 0.5 and 0.75
        self.dropout2 = nn.Dropout(0.5)
        feature = nni.choice('feature', [64, 128, 256])
        self.fc1 = MutableLinear(9216, feature)
        self.fc2 = MutableLinear(feature, 10)

    def forward(self, x):
        x = F.relu(self.conv1(x))
        x = F.max_pool2d(self.conv2(x), 2)
        x = torch.flatten(self.dropout1(x), 1)
        x = self.fc2(self.dropout2(F.relu(self.fc1(x))))
        output = F.log_softmax(x, dim=1)
        return output


model_space = MyModelSpace()
model_space
MyModelSpace(
  (conv1): Conv2d(1, 32, kernel_size=(3, 3), stride=(1, 1))
  (conv2): LayerChoice(
    label='conv2'
    (0): Conv2d(32, 64, kernel_size=(3, 3), stride=(1, 1))
    (1): DepthwiseSeparableConv(
      (depthwise): Conv2d(32, 32, kernel_size=(3, 3), stride=(1, 1), groups=32)
      (pointwise): Conv2d(32, 64, kernel_size=(1, 1), stride=(1, 1))
    )
  )
  (dropout1): MutableDropout(p=Categorical([0.25, 0.5, 0.75], label='dropout'))
  (dropout2): Dropout(p=0.5, inplace=False)
  (fc1): MutableLinear(in_features=9216, out_features=Categorical([64, 128, 256], label='feature'))
  (fc2): MutableLinear(in_features=Categorical([64, 128, 256], label='feature'), out_features=10)
)
This example uses two mutation APIs,
nn.LayerChoice and
nni.choice().
nn.LayerChoice
takes a list of candidate modules (two in this example), one will be chosen for each sampled model.
It can be used like normal PyTorch module.
nni.choice() is used as parameter of MutableDropout, which then takes the result as dropout rate.
More detailed API description and usage can be found here.
备注
We are actively enriching the mutation APIs, to facilitate easy construction of model space. If the currently supported mutation APIs cannot express your model space, please refer to this doc for customizing mutators.
Explore the Defined Model Space
There are basically two exploration approaches: (1) search by evaluating each sampled model independently, which is the search approach in multi-trial NAS and (2) one-shot weight-sharing based search, which is used in one-shot NAS. We demonstrate the first approach in this tutorial. Users can refer to here for the second approach.
First, users need to pick a proper exploration strategy to explore the defined model space. Second, users need to pick or customize a model evaluator to evaluate the performance of each explored model.
Pick an exploration strategy
NNI NAS supports many exploration strategies.
Simply choosing (i.e., instantiate) an exploration strategy as below.
import nni.nas.strategy as strategy
search_strategy = strategy.Random()  # dedup=False if deduplication is not wanted
Pick or customize a model evaluator
In the exploration process, the exploration strategy repeatedly generates new models. A model evaluator is for training and validating each generated model to obtain the model's performance. The performance is sent to the exploration strategy for the strategy to generate better models.
NNI NAS has provided built-in model evaluators, but to start with,
it is recommended to use FunctionalEvaluator,
that is, to wrap your own training and evaluation code with one single function.
This function should receive one single model class and uses nni.report_final_result() to report the final score of this model.
An example here creates a simple evaluator that runs on MNIST dataset, trains for 2 epochs, and reports its validation accuracy.
import nni

from torchvision import transforms
from torchvision.datasets import MNIST
from torch.utils.data import DataLoader


def train_epoch(model, device, train_loader, optimizer, epoch):
    loss_fn = torch.nn.CrossEntropyLoss()
    model.train()
    for batch_idx, (data, target) in enumerate(train_loader):
        data, target = data.to(device), target.to(device)
        optimizer.zero_grad()
        output = model(data)
        loss = loss_fn(output, target)
        loss.backward()
        optimizer.step()
        if batch_idx % 10 == 0:
            print('Train Epoch: {} [{}/{} ({:.0f}%)]\tLoss: {:.6f}'.format(
                epoch, batch_idx * len(data), len(train_loader.dataset),
                100. * batch_idx / len(train_loader), loss.item()))


def test_epoch(model, device, test_loader):
    model.eval()
    test_loss = 0
    correct = 0
    with torch.no_grad():
        for data, target in test_loader:
            data, target = data.to(device), target.to(device)
            output = model(data)
            pred = output.argmax(dim=1, keepdim=True)
            correct += pred.eq(target.view_as(pred)).sum().item()

    test_loss /= len(test_loader.dataset)
    accuracy = 100. * correct / len(test_loader.dataset)

    print('\nTest set: Accuracy: {}/{} ({:.0f}%)\n'.format(
          correct, len(test_loader.dataset), accuracy))

    return accuracy


def evaluate_model(model):
    # By v3.0, the model will be instantiated by default.
    device = torch.device('cuda') if torch.cuda.is_available() else torch.device('cpu')
    model.to(device)

    optimizer = torch.optim.Adam(model.parameters(), lr=1e-3)
    transf = transforms.Compose([transforms.ToTensor(), transforms.Normalize((0.1307,), (0.3081,))])
    train_loader = DataLoader(MNIST('data/mnist', download=True, transform=transf), batch_size=64, shuffle=True)
    test_loader = DataLoader(MNIST('data/mnist', download=True, train=False, transform=transf), batch_size=64)

    for epoch in range(3):
        # train the model for one epoch
        train_epoch(model, device, train_loader, optimizer, epoch)
        # test the model for one epoch
        accuracy = test_epoch(model, device, test_loader)
        # call report intermediate result. Result can be float or dict
        nni.report_intermediate_result(accuracy)

    # report final test result
    nni.report_final_result(accuracy)
Create the evaluator
from nni.nas.evaluator import FunctionalEvaluator
evaluator = FunctionalEvaluator(evaluate_model)
The train_epoch and test_epoch here can be any customized function,
where users can write their own training recipe.
It is recommended that the evaluate_model here accepts no additional arguments other than model.
However, in the advanced tutorial, we will show how to use additional arguments in case you actually need those.
In future, we will support mutation on the arguments of evaluators, which is commonly called "Hyper-parameter tuning".
Launch an Experiment
After all the above are prepared, it is time to start an experiment to do the model search. An example is shown below.
from nni.nas.experiment import NasExperiment
exp = NasExperiment(model_space, evaluator, search_strategy)
Different from HPO experiment, NAS experiment will generate an experiment config automatically. It should work for most cases. For example, when using multi-trial strategies, local training service with concurrency 1 will be used by default. Users can customize the config. For example,
exp.config.max_trial_number = 3   # spawn 3 trials at most
exp.config.trial_concurrency = 1  # will run 1 trial concurrently
exp.config.trial_gpu_number = 0   # will not use GPU
Remember to set the following config if you want to GPU.
use_active_gpu should be set true if you wish to use an occupied GPU (possibly running a GUI):
exp.config.trial_gpu_number = 1
exp.config.training_service.use_active_gpu = True
Launch the experiment. The experiment should take several minutes to finish on a workstation with 2 GPUs.
exp.run(port=8081)
True
Users can also run NAS Experiment with different training services
besides local training service.
Visualize the Experiment
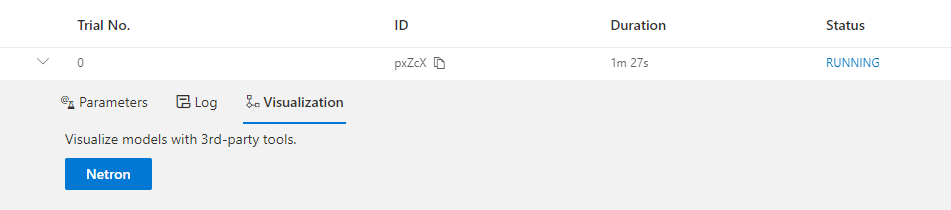
Users can visualize their experiment in the same way as visualizing a normal hyper-parameter tuning experiment.
For example, open localhost:8081 in your browser, 8081 is the port that you set in exp.run.
Please refer to here for details.
We support visualizing models with 3rd-party visualization engines (like Netron).
This can be used by clicking Visualization in detail panel for each trial.
Note that current visualization is based on onnx ,
thus visualization is not feasible if the model cannot be exported into onnx.
Built-in evaluators (e.g., Classification) will automatically export the model into a file.
For your own evaluator, you need to save your file into $NNI_OUTPUT_DIR/model.onnx to make this work.
For instance,
import os
from pathlib import Path


def evaluate_model_with_visualization(model):
    # dump the model into an onnx
    if 'NNI_OUTPUT_DIR' in os.environ:
        dummy_input = torch.zeros(1, 3, 32, 32)
        torch.onnx.export(model, (dummy_input, ),
                          Path(os.environ['NNI_OUTPUT_DIR']) / 'model.onnx')
    evaluate_model(model)
Relaunch the experiment, and a button is shown on Web portal.
Export Top Models
Users can export top models after the exploration is done using export_top_models.
for model_dict in exp.export_top_models(formatter='dict'):
    print(model_dict)
{'conv2': 1, 'dropout': 0.25, 'feature': 256}
Total running time of the script: ( 13 minutes 8.330 seconds)