Run an Experiment on Azure Machine Learning
NNI supports running an experiment on AML , called aml mode.
Setup environment
Step 1. Install NNI, follow the install guide here.
Step 2. Create an Azure account/subscription using this link. If you already have an Azure account/subscription, skip this step.
Step 3. Install the Azure CLI on your machine, follow the install guide here.
Step 4. Authenticate to your Azure subscription from the CLI. To authenticate interactively, open a command line or terminal and use the following command:
az login
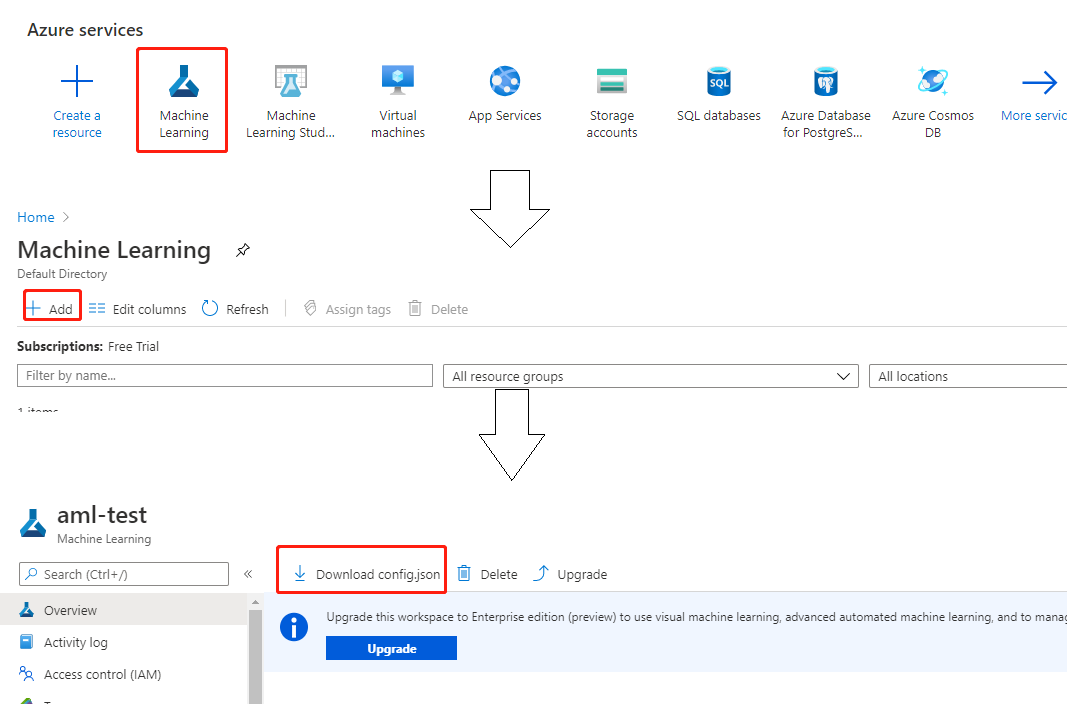
Step 5. Log into your Azure account with a web browser and create a Machine Learning resource. You will need to choose a resource group and specific a workspace name. Then download config.json which will be used later.
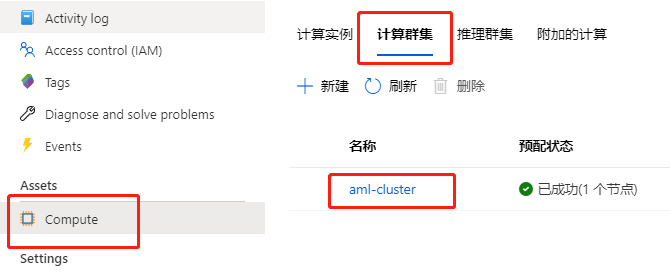
Step 6. Create an AML cluster as the computeTarget.
Step 7. Open a command line and install AML package environment.
python3 -m pip install azureml
python3 -m pip install azureml-sdk
Run an experiment
Use examples/trials/mnist-tfv1 as an example. The NNI config YAML file’s content is like:
authorName: default
experimentName: example_mnist
trialConcurrency: 1
maxExecDuration: 1h
maxTrialNum: 10
trainingServicePlatform: aml
searchSpacePath: search_space.json
#choice: true, false
useAnnotation: false
tuner:
  #choice: TPE, Random, Anneal, Evolution, BatchTuner, MetisTuner, GPTuner
  #SMAC (SMAC should be installed through nnictl)
  builtinTunerName: TPE
  classArgs:
    #choice: maximize, minimize
    optimize_mode: maximize
trial:
  command: python3 mnist.py
  codeDir: .
  image: msranni/nni
  gpuNum: 1
amlConfig:
  subscriptionId: ${replace_to_your_subscriptionId}
  resourceGroup: ${replace_to_your_resourceGroup}
  workspaceName: ${replace_to_your_workspaceName}
  computeTarget: ${replace_to_your_computeTarget}
Note: You should set trainingServicePlatform: aml in NNI config YAML file if you want to start experiment in aml mode.
Compared with LocalMode trial configuration in aml mode have these additional keys:
- image
- required key. The docker image name used in job. The image
msranni/nniof this example only support GPU computeTargets.
- required key. The docker image name used in job. The image
amlConfig:
- subscriptionId
- required key, the subscriptionId of your account
- resourceGroup
- required key, the resourceGroup of your account
- workspaceName
- required key, the workspaceName of your account
- computeTarget
- required key, the compute cluster name you want to use in your AML workspace. See Step 6.
- maxTrialNumPerGpu
- optional key, used to specify the max concurrency trial number on a GPU device.
- useActiveGpu
- optional key, used to specify whether to use a GPU if there is another process. By default, NNI will use the GPU only if there is no other active process in the GPU.
The required information of amlConfig could be found in the downloaded config.json in Step 5.
Run the following commands to start the example experiment:
git clone -b ${NNI_VERSION} https://github.com/microsoft/nni
cd nni/examples/trials/mnist-tfv1

# modify config_aml.yml ...

nnictl create --config config_aml.yml
Replace ${NNI_VERSION} with a released version name or branch name, e.g., v1.8.